Showing posts with label Free Document Editing Tools for Visio. Show all posts

Saturday, 19 September 2015

Break Links - Separate a shape from its connectors

A Free Document Productivity Tool For Visio

This tool quickly separates a shape from its connectors allowing it to be moved without dragging the connectors to a new location.  You can then substitute a new shape in its place.


Using The Tool


In this simple example, Process 4 needs to be moved so that Process 5 can occupy the same place in the flow.


If you move Process 4, the connectors get dragged too.  

You could select the connectors and delete them and then reconnect to Process 5 once it is in place.

Instead, use Break Links


To Use the tool, select the Process 4 and then press the shortcut key to load the Smart Tool Menu (ctl+q)

Then select Break Links from the menu.


Process 4 can be moved but the connectors stay in place


If the replacement shape is the same size, it will automatically connect to the connectors left behind.

The tool allows more than one shape to be selected at a time, but I have yet to find a need for this kind of bulk use.  It might come in handy one day.


Inspiration

I use this tool when preparing process flows. I got tired of reconnecting all the time when I needed to insert shapes.  I don't use it that frequently, but it is saves a lot of time when I do need it.  As much as anything, the tool allows me to avoid distractions and focus on the development of the process model. 

I use the menu concept as a holder for tools I need from time to time. I will release the other items on the menu shortly.


Downloading the Tool

The tool can be downloaded from the Visio Downloads tab


Sunday, 14 June 2015

SmartSize

A Free Document Productivity Tool For Visio

This post provides a tool to resize a group of shapes based on the size of the first one selected.  It assigns the shapes to a group so that the group can be selected and moved, and be easily resized to conform to the new size any one of them.

This is the first in a series of productivity tools for Visio that are avaialble for free download. The tools in this series are:
  • SmartSize –Making a group of shapes the same size and allowing them to be resizing later.
  • SmartAlign – Aligning a group of shapes and allowing them to be realigned later.
  • BreakLinks – Disconnecting the connectors from a shape so that it can be moved without dragging the connectors out of place.


Using the Tool

First, select the shape that you want the others to be resized to.

Second select one or more other shapes.  Note that the first shape has a darker purple boundary than the other shapes.


Finally, Press the shortcut key (Ctl+m)to resize the shapes to the size of the first one selected.


Using the tool on these shapes later.

When a set of shapes is resized, they are assigned to a group.

If you select any one of those shapes  and press the shortcut key.  The rest of the group is selected.


A second press of the shortcut key will resize the group to confirm to size of the first of the group just selected.


You can add to the  group by holding the control key and selecting further

Marcos in Visio

A Free Document Productivity Tool For Visio

This post outlines how to access and use the upcoming Visio tools to be posted shortly.

General Concept

The code for the tools is available from a template that you can download from here.  The idea is to create your own template and copy the published code into into it, then assign each tool to a shortcut key so that it can be quickly accessed.

I have chosen this method to distribute the code so that it can be inspected to show that it is safe to use, and so that it can be used as a learning aid. This is a bare bones approach that is consistent with the approach used for the Word tools and give the user the best control of the process.

Keeping the code in the template means that there is no code in each of the documents created. Other users of the document are therefore not impacted by the tools. 

The downside is that you will probably need several copies of the code in each of the templates that you use, and need to update each when new code is issued.

Copying the code is quite simple and only takes a minute or two.


Creating a New Template

To create a template, take a diagram or start with a blank diagram and use the save as dialogue to create save the document as a "Visio Macro-Enabled Template" (*.vstm) 

I recommend taking the time to get this template just right for the diagram you are working on.  For example, get the default connector correct so you don't have to change format each time, get the view and layout correct and open the usual stencils so these are always at hand for any new diagrams.


Download the Code

Down load the tools template form here. Then open the downloaded template.


Adding Code to the Template

Ensure that the Developer tab is visible.  See the entry at the bottom of the post to do this.


Now open VBA and create a new module. 

Monday, 11 May 2015

Hand-drawn Process Flows: Part 5 - Final Hand-drawn Post

A Free Document Productivity Tool For Visio

This is the final post in the hand-drawn series. Earlier posts where


  • Part 1 - Introduction - How the hand-drawn look is created. Shows all shapes.
  • Part 2 - Basic Shapes - Good for most process flows.
  • Part 3 - More shapes - For more advanced models.
  • Part 4 - Building a hand-drawn template.

New Shapes

This is a quick post to advise that the final hand-drawn stencil now contains two triangles (right angle and isosceles) and a line shape.

I have also included a comment bubble shape from the Visio Guy (see links in the side bar).  I wanted to use this as a prompt for you to visit this site where you can find a number of other hand-drawn shapes including ones for drawing graphs, and a neat cube that has controls to control its layout.

Downloading the shapes

You can download the template and the related stencil shapes from the Visio Downloads page here.

I am keen to hear how you find the shapes, so please leave a comment.

Saturday, 11 April 2015

Hand-drawn Process Flows: Part 4 - Hand-drawn Process Template

A Free Document Productivity Tool For Visio

This post provides a template to use with the hand-drawn process flow shapes. It allows you to complete model simple process flows using Visio's swimlane template. 

The Hand-drawn post series looks like this:

  • Part 1 - Introduction - How the hand-drawn look is created. Shows all shapes.
  • Part 2 - Basic Shapes - Good for most process flows.
  • Part 3 - More shapes - For more advanced models.
  • Part 4 - Building a hand-drawn template.
  • Part 5 - Final post - Three more great hand-draw shapes for process flows.

The Template


The Template allows you to prepare simple swimlane style process models.


It is based on the standard cross functional process flow template provided by Visio and has been tweaked to make entering process flows in the hand-drawn style.

  • The font throughout is comic sans for that handwritten look.
  • The default connector is has a complementary colour and style settings


Pools


The cross functional template does not support the concept of BPNM pools.  I guess that is why Microsoft want you to buy the Professional version where you get inbuilt BPNM capability.


To simulate pools, all I do is create a very small lane and fill the end with black.


SmartAudit Shape

The audit box provides a convenient place to record audit information. It is always worth branding your models.

You can click into the prepared by and date boxes or use F2 to edit each piece of text.  The filename is automatically derived from the document properties and is an example of how fields can be presented inside shapes.

The audit box in its non-hand-drawn format is one of the earliest shapes I

Sunday, 29 March 2015

Hand-drawn Process Flows: Part 3 - More Shapes

A Free Document Productivity Tool For Visio

This post complete hand-drawn process flow shapes. With these tools you can complete model simple process flows using Visio's swimlane template. 

The Hand-drawn post series looks like this:

  • Part 1 - Introduction - How the hand-drawn look is created. Shows all shapes.
  • Part 2 - Basic Shapes - Good for most process flows.
  • Part 3 - More shapes - For more advanced models.
  • Part 4 - Building a hand-drawn template.
  • Part 5 - Quick posts - Three more great hand-draw shapes for process flows.


The Group Shape


The group shape is a standard BPMN shape that defines a set of processes.


The shape can be sized to surround other shapes.  It uses the standard randomizing routines to create the hand-drawn look.

The Data and Output Shape


The data shape is part of the BPMN set and can be used to signify data, information in many formats.  The output shape is not standard BPMNN shape. It is a bit old school these days, but almost everyone viewing it immediately gets the idea.


I had a lot of fun building these shapes.The data one really shows the technique of drawing a right angle.  If you draw it with two lines, Visio wants to smooth the line into a wide curve.  To counter this, you have to draw a line back into the corner before starting the next side.  This gives you a tight corner while still preserving the curve smoothing needed for the long sides.


The output shape required formal curve definitions to get the sweeping curves at the bottom. It uses the ArcTo geometry method which uses start, and end coordinates and a measure for the arch height.


The SmartConnector 

The SmartConnector joins process shapes and is based on the standard dynamic connector .  It includes optional message and activity shapes which can be used to convey meaning
There has been a surprising amount of refinement put into the connector.  It isn’t randomized because I need the dynamic smarts for retaining connection as shapes move.  However I have coloured it to match the hand-drawn standard, and most folk don’t seem to notice.

The text block is positioned just to the right of the start position.  I find this is the most likely location


When you right click you can select Message or Gears.


When either of these is selected, the shape offers a choice of locations at 25%, 50% and 75% from the start. As the length of the line changes, the icons move accordingly


The Note Box


The note box is useful for annotating diagrams. I have used a standard hand-drawn rectangle for the outline and the regular comic sans font.  


The box will also automatically resize as you add content.  It extends down while holding the width constant and demonstrates some useful Shapesheet text control attributes.

Other Shapes

I have added a number of other shapes to this stencil which will be the subject of subsequent posts
  • Swimlane and Pool Edge – These are part of the standard Visio cross functional flowchart tools. I have adapted these for hand-drawn diagrams
  • SmartAudit – This shape gives date, version and author information. It fits nicely into the cross functional flowchart and is linked to the right hand edge so that as the boundaries of the diagram move, so does the auidit box.
  • SmartAnnotation – This annotation tool remains linked to the parent shape is attached to, when the parent moves, the annotation does too.  It’s a real time saver.
  • Speech Bubble – I’ve lifted this from the Visio Guy – Take a look at his site for more fun shapes.
  • Other hand-drawn shapes –I’ll add a triangle shape and a hand-drawn line to the template shortly.

Downloading the shapes

You can download the stencil with these shapes from the Visio Downloads page here.

I am keen to hear how you find the shapes, so please leave a comment.

Monday, 8 December 2014

Hand-drawn Process Flows: Part2 - Basic Shapes

A Free Document Productivity Tool For Visio

This post describes the basic hand-drawn process flow shapes: Start, End, Task and Gateway. With these tools you can model simple process flows using Visio's swimlane template. 

The Hand-drawn post series looks like this:

  • Part 1 - Introduction - How the hand-drawn look is created. Shows all shapes.
  • Part 2 - Basic Shapes - Good for most process flows.
  • Part 3 - More shapes - For more advanced models.
  • Part 4 - Building a hand-drawn template.
  • Part 5 - Quick posts - Three more great hand-draw shapes for process flows.

The Task Shape

The task shape is a basic hand-drawn rectangle that is the basis for many of the other shapes.

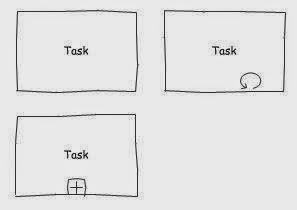
There are two variants on the basic rectangle that you can control by right clicking the shape.

Collapsed indicates that there a detailed definition of the process task. I use this when the process is in another page in the Visio document.  

Loop indicates that the process is repeated.


I don't use the variants very often, they can be too BPMN specific for some audiences, but you might find them useful.  

The text box uses Comic Sans for a  hand-drawn look, and the text box itself is bounded by the shape. I decided not to let the text box expand the size of the box.

Design Note:
Each of the variant icons is a separate geometry in the shape. If you follow the ShapeSheet links, you'll see how clicking the action entry reveals and hides the icons. The user section of the shape has sizing constants that mean the icons grow or shrink as the shape size changes.


The Gateway Shape


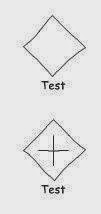
The gateway shape has a similar geometry to the task shape in that it is a rectangle with the same 3 section randomised side as the task shape.  


There is one variant, the plus sign, which is very BPMN specific, so use appropriately.  


Design Note: 
If you look at the geometry of the main shape, you will see a special "Line to" the previous geometry point.  This is an important point.  Without line rounding, Visio "draw" conventional rectangular shapes, however, I need line rounding to smooth out the randomising.  This has the effect of rounding the shape corners too.  By adding a specific line back to each corner, the rounding is cancelled out.

The geometry of the plus sign has User values to control the gap between the sigh and the corner of the shape.  I've added the hand-drawn effect to the plus sign too.


The Start Shape

The start shape is the most complex shape in the palette, it is actually four separate shapes grouped, one for the main shape, one for the intermediate inner ring, and one each for the timer and message icons.

The intermediate icon can be used with or without the other icons, but you can have one one of either timer or message. 


Design Note:
Since I'm using randomised shapes, the challenge is to ensure the inner shapes dont cross over into the outer. To solve this I drew the four shapes at the right size separately. I then created a group with just the main shape ("Start a Group"), then added the first inner shape to the group ("Add to Group"). The inner shape is subordinate to the main, so I could refer to the main shape's randomised values, this means that you get the exact same outline, only a little smaller.

The clock face is easily the most complex shape, I needed a refresher on my high school trigonometry to get the hour marks pointing towards the centre, and each the same length.

The message icon is based on the rectangle with the extra angle.


The End Shape


The End Shape is a cut-down start shape.  I left the message icon, but removed the Timer.

The additional thickness of the outline means that I had to tweak the sensitivity of the "wavy-ness" down a little for this shape.


Downloading the shapes

You can download s stencil with these shapes from the Visio Downloads page here.

See the following post for more hand-drawn shapes.

I am keen to hear how you find the shapes, so please leave a comment.


Sunday, 7 December 2014

Hand-drawn Process Flows - Part 1 - Introduction

A Free Document Productivity Tool for Visio

This post introduces a set of process flow shapes in a "hand-drawn" style. 

Producing process models using these shapes helps convey a “work-in-progress” feel that signals informality and encourages discussion. 

The are suitable for simple flows aimed at a business audience, who should be able to follow them with minimal understanding. I often use them to confirm conversations and draft processes before recording them formally once I have got agreement.

You can use them to prepare standard flowcharts, but they are ideally suited to swim-lane diagrams using the standard Visio template.  See the following example:


The main shapes are a task, start and end circles, and a decision or gateway diamond.  They have a wavy appearance around the edges as if drawn by hand. 

The shapes are actually a subset of the full BPMN suite. Limiting the BPMN
palette reinforces the the “simplicity” intent, but if you right click on many of the shapes you'll see additional display options which provide more BPMN-like models.  In the example above you can see the collapsed and loop icons, and the timer.

Each shape is subtly different from the others of its type. I have optimised the "wavy-ness" of each shape for scale and line thickness, but sometimes the shape may look too extreme. If you right click on the shape you will see the option "Redraw Shape". When this is click,ed a new randomised outline is generated.


Here is a sample of each of the shapes


Inspiration

I liked the idea of hand drawn shapes, several of the major process modelling